arduino 学习(4)

存储和无线通信(红外)

  1. 断电也能保存数据 —— EEPROM 类库的使用
    EEPROM (Electrically Erasable Programmable Read-Only Memory)电可擦可编程只读寄存器
    1. 类库成员函数
      write()
      read()
    2. 写入操作
      EEPROM只有100000次的擦写寿命,避免频繁擦写。
      1
      2
      3
      4
      5
      6
      7
      8
      9
      10
      11
      12
      13
      14
      15
      16
      17
      18
      19
      20
      21
      22
      23
      #include <EEPROM.h>

      int addr = 0;

      void setup() {
      // put your setup code here, to run once:
      Serial.begin(9600);
      }

      void loop() {
      // put your main code here, to run repeatedly:
      int val = analogRead(0) / 4;
      Serial.println(val);

      EEPROM.write(addr, val);

      addr = addr + 1;
      if (addr == 512)
      addr = 0;

      delay(500);
      }

    3. 读取操作
      1
      2
      3
      4
      5
      6
      7
      8
      9
      10
      11
      12
      13
      14
      15
      16
      17
      18
      19
      20
      21
      22
      23
      24
      25
      26
      #include <EEPROM.h>

      int address = 0;
      byte value;

      void setup() {
      // put your setup code here, to run once:
      Serial.begin(9600);
      }

      void loop() {
      // put your main code here, to run repeatedly:
      value = EEPROM.read(address);
      Serial.print(address);
      Serial.print("\t");
      Serial.print(value, DEC);
      Serial.println();

      address = address + 1;

      if (address == 512)
      address =0;

      delay(500);
      }

    4. 擦除操作
      即为写0
    5. 存储各类型数据到EEPROM
      上面是把一个byte型数据存入,如果是其他类型则可以使用共用体类型结构 union。
      写入
      1
      2
      3
      4
      5
      6
      7
      8
      9
      10
      11
      12
      13
      14
      15
      16
      17
      18
      19
      20
      21
      22
      23
      24
      25
      26
      27
      28
      29
      #include <EEPROM.h>

      int addr = 0;

      union data {
      float a;
      byte b[4];
      };

      data c;
      int led = 13;

      void setup() {
      // put your setup code here, to run once:
      c.a = 98.132;

      for (int i = 0; i < 4; i++) {
      EEPROM.write(i, c.b[i]);
      }
      pinMode(led, OUTPUT);
      }

      void loop() {
      digitalWrite(led, HIGH);
      delay(1000);
      digitalWrite(led, LOW);
      delay(1000);
      }

读取

1
2
3
4
5
6
7
8
9
10
11
12
13
14
15
16
17
18
19
20
21
22
23
24
#include <EEPROM.h>

union data {
float a;
byte b[4];
};

int addr = 0;
data c;
int led = 13;

void setup() {
// put your setup code here, to run once:
for (int i = 0; i < 4; i++) {
c.b[i] = EEPROM.read(i);
}
Serial.begin(9600);
}

void loop() {
Serial.println(c.a, 4);
delay(1000);
}

  1. 保存大量数据 —— SD卡类库的使用
    SD (Secure Digital Memory Card)

    1. 格式化SD卡
    2. SD卡类库成员函数
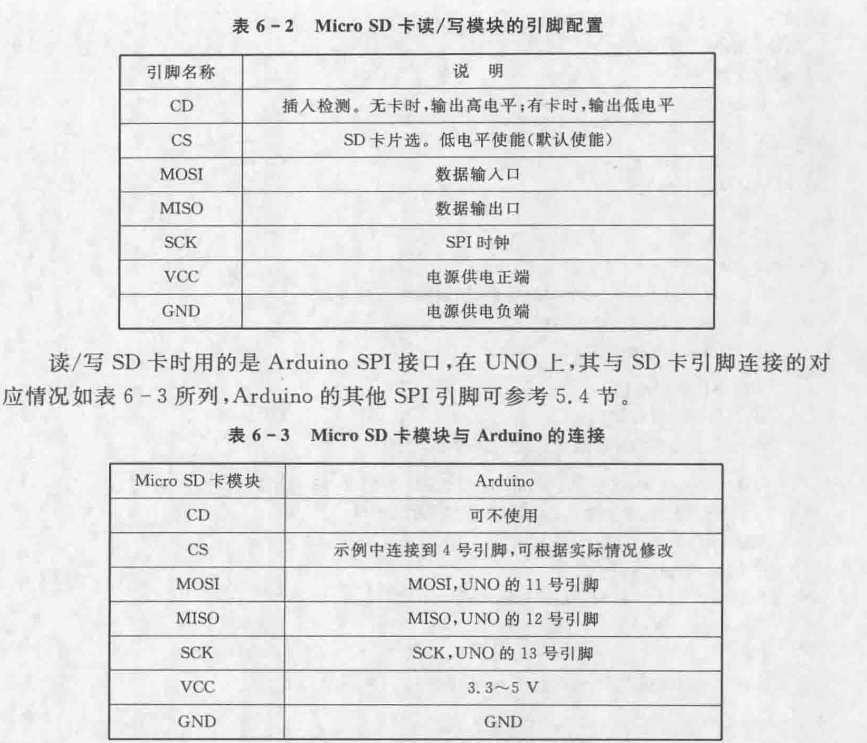
    3. SD卡 读/写模块
      将传感器的数据记录/读出
      2023-08-09T151243
    4. 创建文件
    5. 删除文件
      6 .写文件
    6. 读文件
  2. 无线通信 —— 红外遥控
    Arduino可使用的防线通信方式众多,ZigBee、WiFi和蓝牙等。
    串口透传模块
    SPI接口的无线模块,Arduino Wifi扩展板

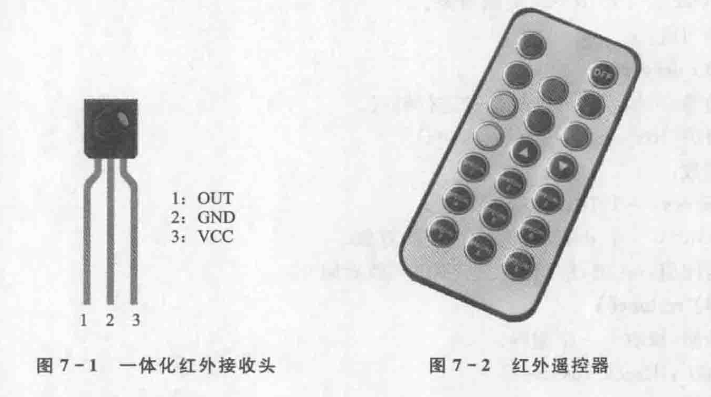
    1. 一体化红外接收头
      接收红外信号并还原发射端的波形信号,通常一体化的都是在38kHz左右。

    2. 红外遥控器
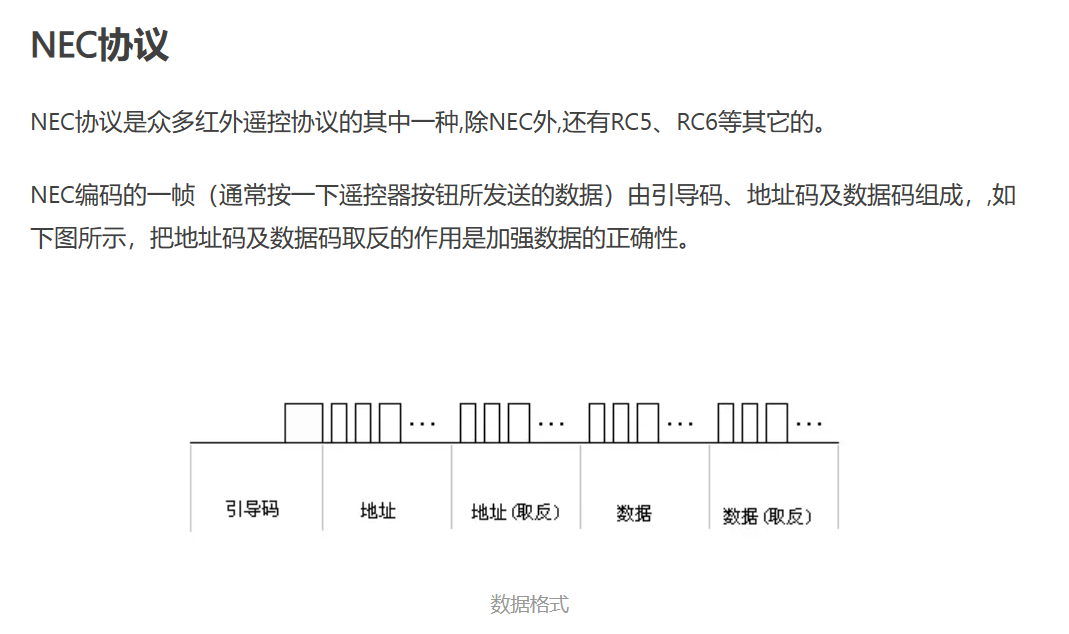
      NEC编码
      2023-08-09T153505
      2023-08-09T154103

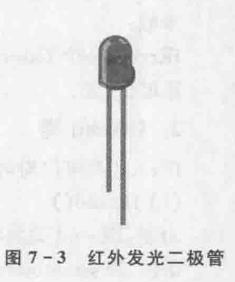
    3. 红外发光二极管
      IRremote库
      2023-08-09T154114

    4. 类库成员函数

    5. 红外接收
      IRremote一直在更新,现在已经比较复杂了。
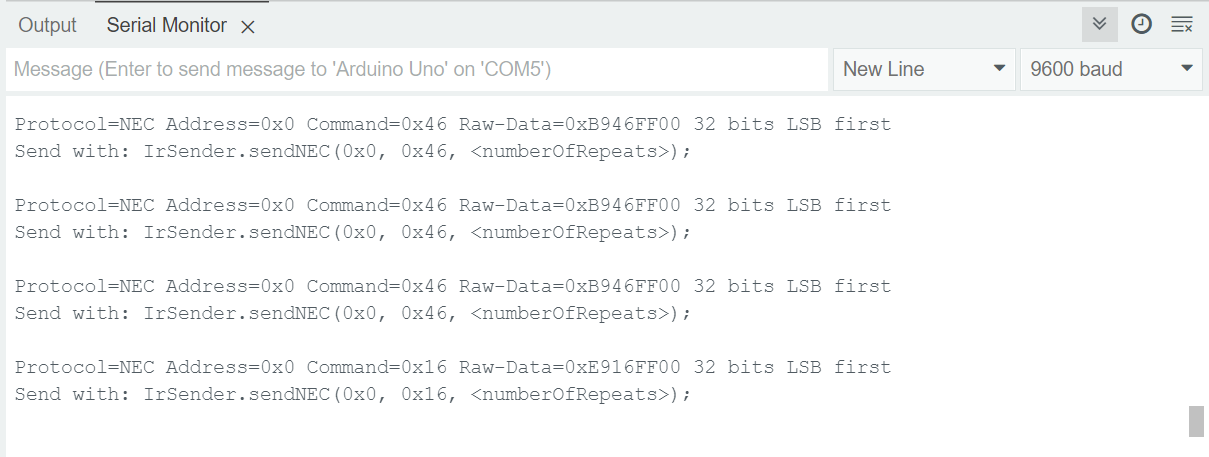
      这是其中的SimpleReceiver.ino 文件

1
2
3
4
5
6
7
8
9
10
11
12
13
14
15
16
17
18
19
20
21
22
23
24
25
26
27
28
29
30
31
32
33
34
35
36
37
38
39
40
41
42
43
44
45
46
47
48
49
50
51
52
53
54
55
56
57
58
59
60
61

#define DECODE_NEC // Includes Apple and Onkyo

#include <Arduino.h>

#include "PinDefinitionsAndMore.h" // Define macros for input and output pin etc.
#include <IRremote.hpp>

void setup() {
Serial.begin(9600);
// Just to know which program is running on my Arduino
Serial.println(F("START " __FILE__ " from " __DATE__ "\r\nUsing library version " VERSION_IRREMOTE));

// Start the receiver and if not 3. parameter specified, take LED_BUILTIN pin from the internal boards definition as default feedback LED
IrReceiver.begin(IR_RECEIVE_PIN, ENABLE_LED_FEEDBACK);

Serial.print(F("Ready to receive IR signals of protocols: "));
printActiveIRProtocols(&Serial);
Serial.println(F("at pin " STR(IR_RECEIVE_PIN)));
}

void loop() {
/*
* Check if received data is available and if yes, try to decode it.
* Decoded result is in the IrReceiver.decodedIRData structure.
*
* E.g. command is in IrReceiver.decodedIRData.command
* address is in command is in IrReceiver.decodedIRData.address
* and up to 32 bit raw data in IrReceiver.decodedIRData.decodedRawData
*/
if (IrReceiver.decode()) {

/*
* Print a short summary of received data
*/
IrReceiver.printIRResultShort(&Serial);
IrReceiver.printIRSendUsage(&Serial);
if (IrReceiver.decodedIRData.protocol == UNKNOWN) {
Serial.println(F("Received noise or an unknown (or not yet enabled) protocol"));
// We have an unknown protocol here, print more info
IrReceiver.printIRResultRawFormatted(&Serial, true);
}
Serial.println();

/*
* !!!Important!!! Enable receiving of the next value,
* since receiving has stopped after the end of the current received data packet.
*/
IrReceiver.resume(); // Enable receiving of the next value

/*
* Finally, check the received data and perform actions according to the received command
*/
if (IrReceiver.decodedIRData.command == 0x10) {
// do something
} else if (IrReceiver.decodedIRData.command == 0x11) {
// do something else
}
}
}

2023-08-09T163403
可以看到读出一些红外值。
6. 红外发射

1
2
3
4
5
6
7
8
9
10
11
12
13
14
15
16
17
18
19
20
21
22
23
24
25
26
27
28
29
30
31
32
33
34
35
36
37
38
39
40
41
42
43
44
45
46
47
48
49
50
51
52
53
54
55
56
57
58
59
60
61
62
63
64
65
66
67
68
69
70
71
72
73
74
75
76
77
78
/*
* SimpleSender.cpp
*
* Demonstrates sending IR codes in standard format with address and command
* An extended example for sending can be found as SendDemo.
*
* Copyright (C) 2020-2022 Armin Joachimsmeyer
* armin.joachimsmeyer@gmail.com
*
* This file is part of Arduino-IRremote https://github.com/Arduino-IRremote/Arduino-IRremote.
*
* MIT License
*/
#include <Arduino.h>

#define DISABLE_CODE_FOR_RECEIVER // Disables restarting receiver after each send. Saves 450 bytes program memory and 269 bytes RAM if receiving functions are not used.
//#define SEND_PWM_BY_TIMER // Disable carrier PWM generation in software and use (restricted) hardware PWM.
//#define USE_NO_SEND_PWM // Use no carrier PWM, just simulate an active low receiver signal. Overrides SEND_PWM_BY_TIMER definition

#include "PinDefinitionsAndMore.h" // Define macros for input and output pin etc.
#include <IRremote.hpp>

void setup() {
pinMode(LED_BUILTIN, OUTPUT);

Serial.begin(115200);

// Just to know which program is running on my Arduino
Serial.println(F("START " __FILE__ " from " __DATE__ "\r\nUsing library version " VERSION_IRREMOTE));
Serial.print(F("Send IR signals at pin "));
Serial.println(IR_SEND_PIN);

/*
* The IR library setup. That's all!
*/
// IrSender.begin(); // Start with IR_SEND_PIN as send pin and if NO_LED_FEEDBACK_CODE is NOT defined, enable feedback LED at default feedback LED pin
IrSender.begin(DISABLE_LED_FEEDBACK); // Start with IR_SEND_PIN as send pin and disable feedback LED at default feedback LED pin
}

/*
* Set up the data to be sent.
* For most protocols, the data is build up with a constant 8 (or 16 byte) address
* and a variable 8 bit command.
* There are exceptions like Sony and Denon, which have 5 bit address.
*/
uint8_t sCommand = 0x34;
uint8_t sRepeats = 0;

void loop() {
/*
* Print current send values
*/
Serial.println();
Serial.print(F("Send now: address=0x00, command=0x"));
Serial.print(sCommand, HEX);
Serial.print(F(", repeats="));
Serial.print(sRepeats);
Serial.println();

Serial.println(F("Send standard NEC with 8 bit address"));
Serial.flush();

// Receiver output for the first loop must be: Protocol=NEC Address=0x102 Command=0x34 Raw-Data=0xCB340102 (32 bits)
IrSender.sendNEC(0x00, sCommand, sRepeats);

/*
* Increment send values
*/
sCommand += 0x11;
sRepeats++;
// clip repeats at 4
if (sRepeats > 4) {
sRepeats = 4;
}

delay(1000); // delay must be greater than 5 ms (RECORD_GAP_MICROS), otherwise the receiver sees it as one long signal
}


7. 遥控家电设备
需要接受家电红外的RAW数据,并且使用红外发射器发射出去。

tips:

  1. 记录一下学习过程中没有的硬件
    1. SPI的数字电位器 AD5206 没有
    2. 多个串口通信需要多个Arduino
    3. LM35温度传感器好像坏掉了
    4. SD卡模块
    5. DGT11温湿度检测模块
    6. 光敏模块 目前只有一根光敏电阻

arduino 学习(4)
https://leiz-eng.github.io/2023/08/09/arduino-4/
作者
Lei Zhao
发布于
2023年8月9日
许可协议