arduino 学习(3)—— 通信
Arduino 与 外部设备的通信方式,均属串行通信,相对于并行,占用的I/O口少,速度慢。有串口, IIC, SPI三种常见的通信方式。
硬件串口通信
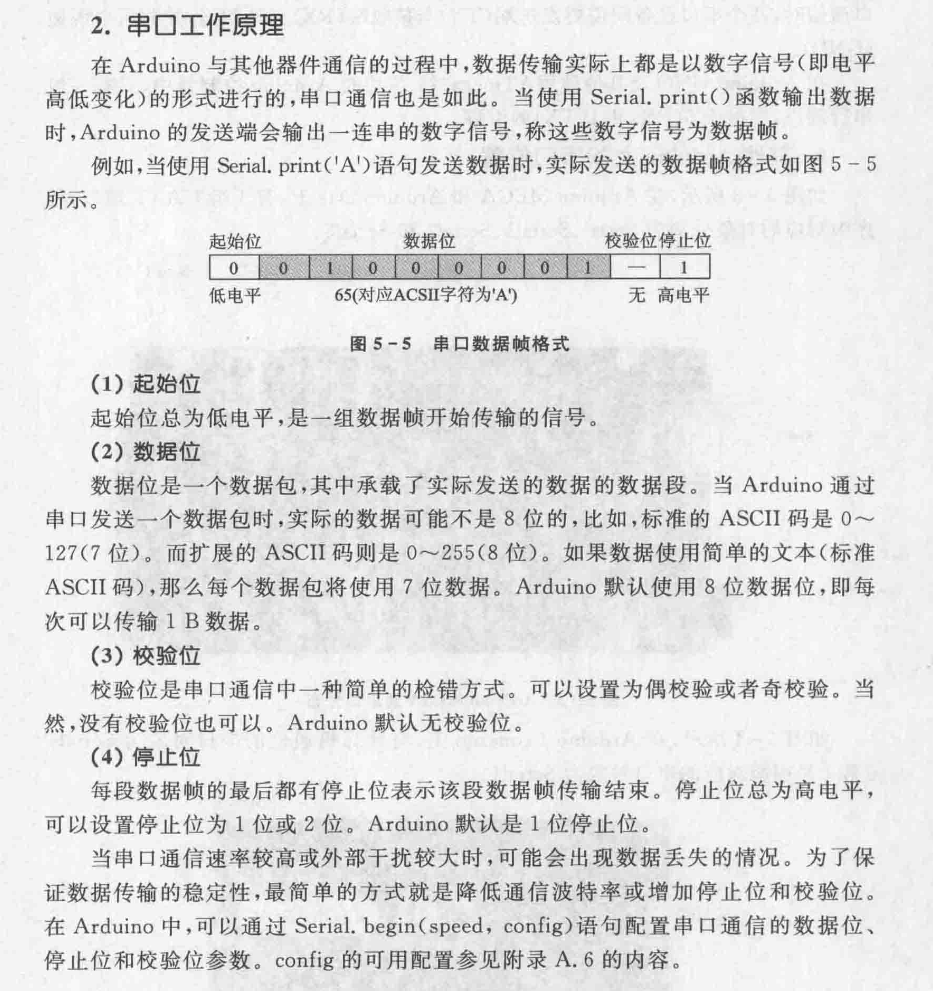
- HardwareSerial类库成员函数
- available()
- print()和write()之间的差异
print是转为ascii码后发送,write是直接发送数值。 - read()和peek()输入方式的差异
read会移除,peek不会。 - 串口读取字符串
1
2
3
4
5
6
7
8
9
10
11
12
13
14
15
16
17
18
19
void setup() {
// put your setup code here, to run once:
Serial.begin(9600);
}
void loop() {
String inString = "";
while (Serial.available() > 0) {
char inChar = Serial.read();
inString += (char)inChar;
delay(10);
}
if(inString != "") {
Serial.print("Input String: ");
Serial.println(inString);
}
} - 串口事件
仅仅运行在两次loop之间的函数。1
2
3
4
5
6
7
8
9
10
11
12
13
14
15
16
17
18
19
20
21
22
23
24
25
26
27
28
29
30
31
32
33
34
35
36
37
38
39
40
41
42
43
44
45
46
47
48
49
50
51
52
53
54
55
56
57
58
59/*
Serial Event example
When new serial data arrives, this sketch adds it to a String.
When a newline is received, the loop prints the string and clears it.
A good test for this is to try it with a GPS receiver that sends out
NMEA 0183 sentences.
NOTE: The serialEvent() feature is not available on the Leonardo, Micro, or
other ATmega32U4 based boards.
created 9 May 2011
by Tom Igoe
This example code is in the public domain.
https://www.arduino.cc/en/Tutorial/BuiltInExamples/SerialEvent
*/
String inputString = ""; // a String to hold incoming data
bool stringComplete = false; // whether the string is complete
void setup() {
// initialize serial:
Serial.begin(9600);
// reserve 200 bytes for the inputString:
inputString.reserve(200);
}
void loop() {
// print the string when a newline arrives:
if (stringComplete) {
Serial.print(inputString);
// clear the string:
inputString = "";
stringComplete = false;
}
}
/*
SerialEvent occurs whenever a new data comes in the hardware serial RX. This
routine is run between each time loop() runs, so using delay inside loop can
delay response. Multiple bytes of data may be available.
*/
void serialEvent() {
while (Serial.available()) {
// get the new byte:
char inChar = (char)Serial.read();
// add it to the inputString:
inputString += inChar;
// if the incoming character is a newline, set a flag so the main loop can
// do something about it:
if (inChar == '\n') {
stringComplete = true;
}
}
} - 串口缓冲区
默认64字节,如果要自定义,可以1
2#define SERIAL_TX_BUFFER_SIZE 128
#define SERIAL_RX_BUFFER_SIZE 128 - 串口控制RGB LED 调光
1
2
3
4
5
6
7
8
9
10
11
12
13
14
15
16
17
18
19
20
21
22
23
24
25
26
27
28
29
30
31
32
33
34
35
36
37
38
39
40
41
42
43
44
45
46
47
48
49
50
51String inputString = ""; // a String to hold incoming data
bool stringComplete = false; // whether the string is complete
int i;
char LED = ' ';
void setup() {
// initialize serial:
Serial.begin(9600);
// reserve 200 bytes for the inputString:
}
void loop() {
// print the string when a newline arrives:
if (stringComplete) {
Serial.print(LED);
Serial.println(i);
if (LED == 'A') {
analogWrite(3, i);
} else if (LED == 'B') {
analogWrite(5, i);
} else if (LED == 'C') {
analogWrite(6, i);
}
// clear the string:
inputString = "";
stringComplete = false;
LED = ' ';
}
}
/*
SerialEvent occurs whenever a new data comes in the hardware serial RX. This
routine is run between each time loop() runs, so using delay inside loop can
delay response. Multiple bytes of data may be available.
*/
void serialEvent() {
while (Serial.available()) {
// get the new byte:
char inChar = (char)Serial.read();
// add it to the inputString:
if (isDigit(inChar)) {
inputString += inChar;
} else if (inChar == '\n') {
stringComplete = true;
i = inputString.toInt();
} else {
LED = inChar;
}
}
} - 串口调试助手
Arduino串口助手
- HardwareSerial类库成员函数
软件模拟串口
SoftwareSerial类库,将数字引脚通过程序来模拟成串口通信引脚。
可用于两个Arduino设备间的通信等,暂不讨论。IIC 总线的使用 —— Wire类库
IIC (Inter-Integrated Circuit)两根双向总线,数据线SDA和时钟线SCL。和Arduino的TWI(Two-Wire serial Interface)接口是一回事。- IIC主机、从机与引脚
与串口的一对一通信方式不同,总线通信通常由主机Master和从机之分。主机负责启动和终止数据发送,同时还要输出时钟信号;从机会被主机寻址,并且响应主机的通信请求。串口需要事先约定相同的波特率,IIC通信中,通信速率控制由主机完成,通过CSL引脚输出时钟信号,供总线上的所有从机使用。
半双工通信方式,数据的发送和接收由主机控制,切换进行。
IIC上的所有通信都是由主机发起的,总线上的设备都应该有各自的地址。主机可以通过这些地址向总线上的任一设备发起连接,从机响应请求并建立连接口,便可进行数据传输。 - Wire类库
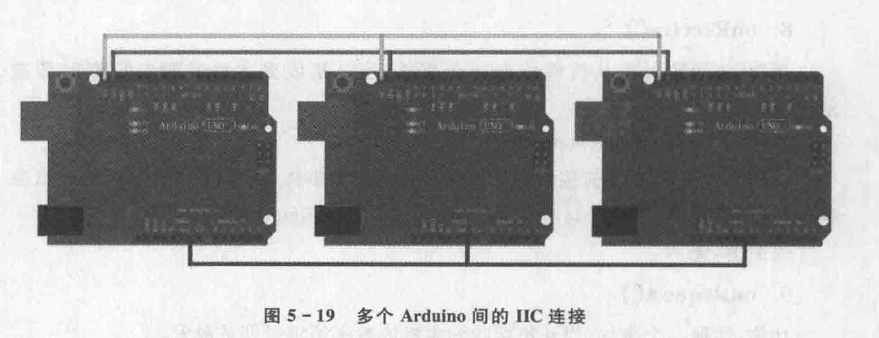
- IIC连接
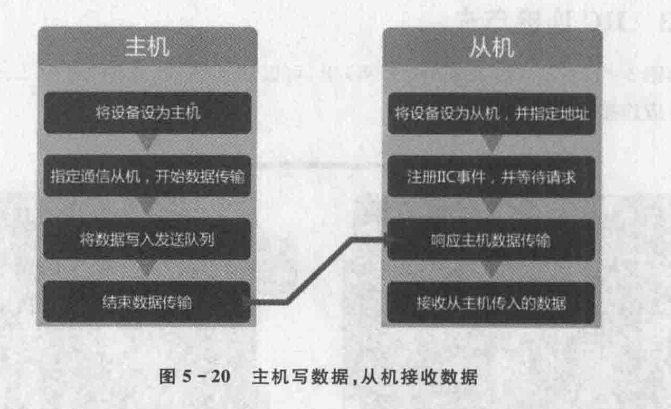
- 主机写数据,从机接收数据
主句告诉从机要发送数据了,从机准备接收数据。
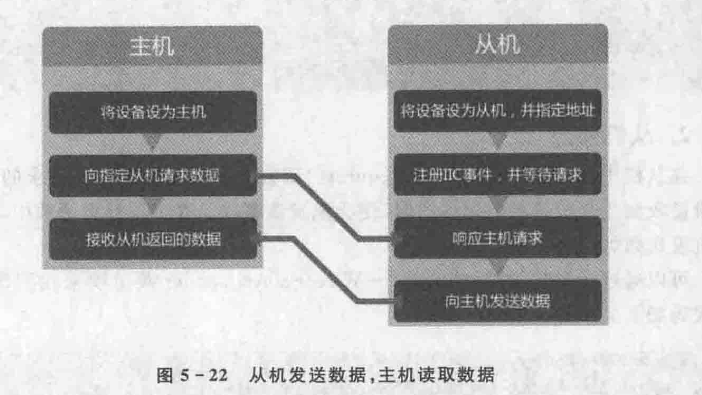
- 从机发送数据,主机接收数据
主机告诉从机准备接收数据了,从机发送数据
- IIC主机、从机与引脚
SPI总线的使用 —— SPI类库
SPI (Serial Peripheral Interface)是一种高速通信接口。SD卡,图形液晶,网络芯片等。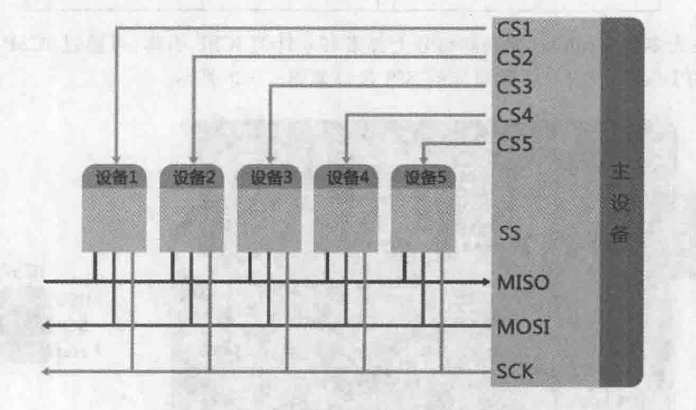
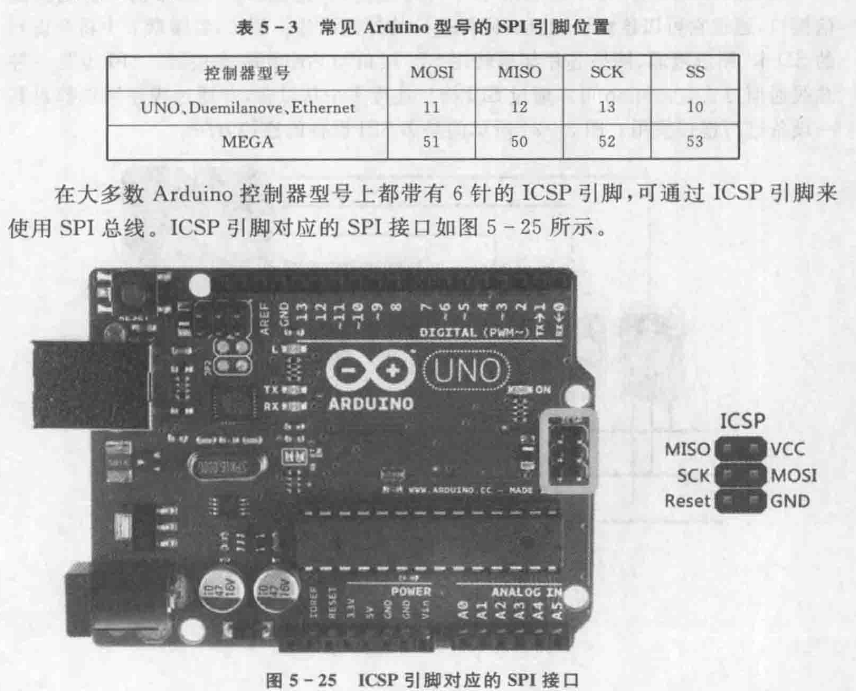
- SPI引脚
在一个SPI设备中,通常有如下几个引脚:

SPI总线中,也有主、从机之分,主机负责输出时钟信号及选择通信的从设备。时钟信号会通过主机的SCK引脚输出,提供给通信从机使用。而对于通信从机的选择,由从机上的CS引脚决定,当CS引脚为低电平时,选中;高电平时,断开。数据的收发,通过MISO和MOSI进行
- 从设备选择
Arduino一般都是作为主机使用的,并且SPI类库中没有提供Arduino作为从机的API。使用哪个设备就拉低那个CS引脚,并将其他引脚拉高。SS引脚只有在作为从机时才会使用,但即使不适用,也要将其保持为输出状态,斗则会造成SPI无法使用的情况。 - SPI类库成员函数
- SPI总线上的数据发送与接收
SPI是一种同步串行总线,收/发数据可以同时进行。使用transfer函数代替write和read函数,参数是发送的数据,返回值是接收的数据。 - SPI控制使用数字电位器(暂无硬件设备)
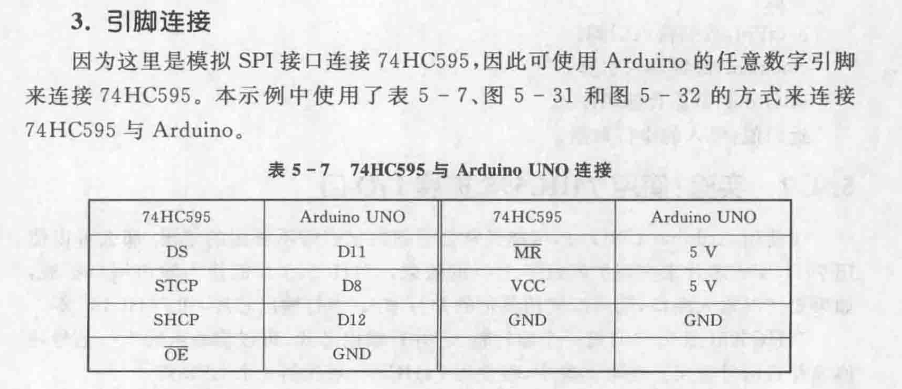
- 软件模拟SPI通信
将任意数字引脚模拟为SPI通信。 - 使用74HC595扩展I/O口
这里注意第一个串行输入的位,是并行输出的最后一个位。
- SPI引脚
1 | |
tips:
- spi传输顺序
LSB:least significant bit 表示二进制数据的最低位
MSB : most significant bit 表示二进制数据的最高位
spi传输数据时有两种方式:MSB first 和LSB first - #include指令有两种形式:
① #include <stdio.h>
② #include “mycoce.h”
第一种即<>告诉预处理器在标准系统目录中查找文件,第二种即””告诉预处理器首先在当前目录中(或者文件名指定的其他目录)查找文件,找不到再查找标准系统目录
arduino 学习(3)—— 通信
https://leiz-eng.github.io/2023/08/08/arduino-3/